Writing in Primary – Part III: Extended writing

child writing

In the first part of this series, I looked at how to initiate early primary students in writing in English, and in Part II I focused on how writing activities can be built into the CLIL classroom. In this, the third part of the series, I’m going to look at ways to get students producing longer texts, either on their own or as part of a team. Here, the focus is inevitably on upper primary, although the ages at which the different activities can be used will vary widely depending on the programme of each school, and some of these activities may be more suited to early secondary in some schools.

Scaffolding longer texts

One of the things which less proficient writers find daunting about producing longer texts is the very fact that they are being asked to write something longer than a couple of sentences. Faced with the blank page, they will often simply tell you they don’t know what to write. As teachers, our job is to support them in this stage, helping them to develop strategies which will allow them to develop longer texts. For this reason, it is very important that longer writing tasks be done in class rather than for homework – the students will need individual support as they begin their writing. Once they are writing confidently they can be asked to finish their work for homework if need be. I find the best way to scaffold longer texts is to break down the requirements into smaller, more manageable parts. In Part II we saw an example of this with the water cycle exercise, Imagen water cycle
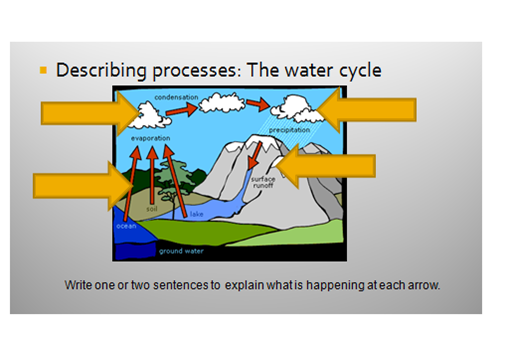
where the students were asked to write one or two sentences about each step in the process, rather than simply being asked to write a paragraph describing the water cycle. On the worksheet the different steps are visually separated, so that what they are producing does not have the appearance of a long text. Once the students have produced their texts on the worksheet, you can ask them to copy the corrected version into their notebooks in the form of a paragraph, so that they realise how much they have been able to write, but only after they have successfully completed the worksheet. This enhances the sense of achievement, and success breeds success.

Picture stories are another useful way of breaking down longer more complex texts into more manageable parts. I use the stories from the speaking part of the Movers and Flyers exams, and in this way the students have more practise with the type of story they will face in the exam at the end of the year. You can see an example of one of these stories here, taken from Gray (2000).

Flyers Speaking Story

We can also get our students to make comic strips, producing their own pictures and adding text to each one. This can be done very simply by folding a piece of paper in half, in half again and in half again, which will divide the page into eight sections, for eight pictures. A more sophisticated alternative is to make a mini-book, instructions for which you can find here. This is a great way to check comprehension of something done in class, whether a story, or the steps in a process. I have used it to review extended reading, and to wind up work on biographies of famous people.

Collaborative writing

Another way to scaffold longer texts is to have students work together to create a text. This can be modelled using the ‘Mission Impossible!‘ activity, where each student has to create a correct sentence to form part of a story against the clock, with the teacher writing the story up on the board. Then put the students into groups of four and explain that each person will dictate one sentence of the text to the rest of the group. The other members of the group decide if they think the sentence is correct and appropriate or if it needs editing, and when they are all satisfied with the sentence they all write it down. Then the next person in the group dictates what they feel should be the next sentence in the text, and so on. This can be used to write picture stories, or any kind of text. It is very important that they have a clear idea of what they have to write about before they begin. I have used this to practise writing descriptions of places, projecting a photograph so that they are all describing the same place. This is also useful as practice for the Cambridge Preliminary (PET) speaking exam, where candidates are asked to speak for a minute about a photograph.

A slightly crazy version of collaborative writing can be a lot of fun for the end of term (although don’t expect great quality from the texts produced). Each student starts off with a piece of paper, and the teacher dictates the first sentence of a story, appropriate for the time of year or the topics being covered in class at that time. Each student then writes the next sentence in that story, and passes the paper to the student sitting next to him / her. each student then has to write the next sentence of the story they have in front of them before passing the paper on again. In this way you have as many stories circulating in the classroom as there are students, and each one will be different. As I have said, this is just a fun activity, but the students are still reading each text and writing, as well as revising what has been written before.

Final words

As I said at the beginning of this post, these activities may be suitable for primary students in some schools but more suitable for secondary students in other settings. The important thing is to get our students writing as early as possible, so that producing texts is seen as a normal part of the English (or CLIL) class. There are many other techniques we can use, and I hope that readers will share their own ideas through the comments section. One thing I have not touched on here is the use of technology in the writing class, and I hope to come back to that topic soon.

References

GRAY, E. (2000) Skills Builder for Young Learners: Flyers 1 – Student’s Book Newbury, Express Publishing.

Tips for Speaking Tests (III)

speeddaten

In most Cambridge exams, the candidates work together in pairs in at least some of the tasks. This allows the candidates to use a wider range of language than they could if they were just answering the questions they were asked by the examiner. As they work together, they use language to propose different ideasexpress agreement and disagreement and negotiate to a final decision. How successfully they work together is measured in a specific mark, Interactive Communication. Interactive Communication is not only judged when the candidates speak together, it is also observed when the candidates interact with the examiner, but it is most obvious when the candidates work together. In this section, we will look at strategies to improve this mark.

The first thing to say here may seem far to obvious to include – candidates should look at each other during this phase of the test. Too many candidates seem unsure where to look when the collaborative activity begins, and many begin to address their answer to the examiner rather than their partner, requiring further support from the examiner to get them back on track.

The candidate not speaking should also look at his / her partner as they speak, or at the prompt they are talking about, giving non-verbal feedback (nodding, making agreeing noises – ‘mm-hm’, etc.). Some candidates go as far as ‘duetting’, joining in with what the other candidate is saying so that they finish a sentence in unison, or reformulating what their partner has said. All of these strategies are part of ‘active listening’, which forms part of authentic spoken interaction.

English: The Active Listening Chart shows the ...

An extension of this is to make some reference to what the partner has said at the beginning of the following turn, ‘linking your contributions to those of your partner’. This comes in the marking criteria for FCE and above, but it is useful to train even PET level students to do this in a simple way. Perhaps the easiest way is a simple expression of agreement / disagreement – ‘Yes, I agree with you, but don’t you think…’, or ‘I see your point,, but…’.

Now watch this video of Part 3 of an FCE exam and observe how the candidates work together:

Finally, when interacting either with the examiner or the other candidate, don’t be afraid to ask for clarification if you are unsure what they have said. It is fine to ask ‘Can you repeat that, please’ if you are not sure about an instruction. The examiners are looking for contributions which are relevant, so it is important to know exactly what you are being asked to do. In parts 2 and 3, the key questions are printed at the top of the pages given to the candidates:

Please note that in the exam, the pictures are in colour (images from Cambridge University Press).

Speaking exams: What to do… and what to avoid

This post is published in association with TESOL Spain e-Newsletter. For other posts in this series click here.

As the main external exam season starts, I thought this would be a good time to write a post giving tips for how to approach the speaking exams in particular. To kick off, here is a new video from Cambridge English TV with some useful ideas about answering questions in the speaking tests.

Answering the questions

Clearly, you cannot be marked on language which you do not produce, so you should aim to answer questions fully. However, sometimes the question seems to be asking for a simple answer – an apparently closed question with no interrogative pronoun. In this case, the temptation is to give the simple answer, but these questions are provided with a possible back-up question in the examiner’s script – ‘Why?’, so if the candidate does not elaborate sufficiently in their answer, they can be prompted to do so. It causes a better impression if the candidate does not wait to be asked why, but explains and elaborates their answer from the beginning. It shows they are more willing to speak, and gives a more natural feel to the conversation.

English: Speech balloons. Question and Answer....

(Photo credit: Wikipedia)

There is a great temptation to prepare answers beforehand, particularly for the questions in Part 1 of the test which everyone is asked (‘Where are you from?’  ‘Where do yo live?’ or ‘What do yo like about living there?’, for example). However, it is usually quite obvious to the examiner that an answer is prepared, and it will possibly be cut short. Teachers should be particularly wary of relying on prepared answers for their students. In one examining session last year, I examined eight or ten candidates from the same class, one after another. When asked ‘What do you like about living here in Madrid?’ every one of them spoke of the fantastic public transport system which the city has. Clearly, this quickly became irritating and received no credit.

Language in the speaking exam

In all levels of Cambridge exam, from YLE Starters up to Proficiency, there is, logically, a specific mark for pronunciation. When we talk about this aspect of language, there is a tendency to focus on accent, and specifically whether the candidate is capable of reproducing a particular native speaker accent. However, the examiner is not measuring the non-native candidate against a native-speaker norm. The emphasis is instead on reproducing the individual sounds, intonation and stress patterns of English in a way which does not impede comprehension. While higher levels of exam require the candidate to be ‘intelligible’, lower levels, such as KET or PET allow for a fairly intrusive L1 accent which may make comprehension more difficult at times.

The above video, from the Cambridge English TV channel on You Tube, focuses on word stress, and how a change in stress may mark a change in meaning, and so impede understanding if not reproduced accurately. This word stress can be realised in any accent, native or non-native. Similarly, sentence stress is not dependent on accent. English is traditionally a stress-timed language, as opposed to a syllable-timed language like, for example, Spanish. This means that a successful candidate should be able to place the stress on the correct syllables within an utterance, and at higher levels (CAE or CPE particularly) the candidate should be able to use stress to suplement the meaning of the utterance.

Another important aspect which can be reproduced accurately whatever the accent of the candidate is intonation. A successful candidate should be able to use rising and falling tones within the utterance in order to indicate the internal structure of the utterance, usually rising at the end of each element of a list, for example, or at breaks in an utterance usually represented graphically by a comma, then falling at the end of an utterance, represented graphically by a full stop.This can actually have more effect on understanding at times than accuracy in individual sounds. Several years ago, I examined a PET candidate who reproduced individual sounds accurately, but whose intonation was so wrong that he was almost impossible to understand.

Clearly examiners must also focus on the accurate reproduction of individual sounds. However, different accents imply different versions of individual sounds. Here too, the important thing is to be understood with relative ease, avoiding as far as possible L1 intrusions. It doesn’t matter if the student pronounces ‘Tomato’ as in British English or in American English, but if they say ‘city’ as ‘thity’ (a typical Spanish error, since in Spain, the ‘ci’ and ‘ce’ are pronounced ‘thi’ and ‘the’), that impedes understanding, and so is marked down.

Working together

In most Cambridge exams, the candidates work together in pairs in at least some of the tasks. This allows the candidates to use a wider range of language than they could if they were just answering the questions they were asked by the examiner. As they work together, they use language to propose different ideas, express agreement and disagreement and negotiate to a final decision. How successfully they work together is measured in a specific mark, Interactive Communication. Interactive Communication is not only judged when the candidates speak together, it is also observed when the candidates interact with the examiner, but it is most obvious when the candidates work together. In this section, we will look at strategies to improve this mark.

The first thing to say here may seem far to obvious to include – candidates should look at each other during this phase of the test. Too many candidates seem unsure where to look when the collaborative activity begins, and many begin to address their answer to the examiner rather than their partner, requiring further support from the examiner to get them back on track.

The candidate not speaking should also look at his / her partner as they speak, or at the prompt they are talking about, giving non-verbal feedback (nodding, making agreeing noises – ‘mm-hm’, etc.). Some candidates go as far as ‘duetting’, joining in with what the other candidate is saying so that they finish a sentence in unison, or reformulating what their partner has said. All of these strategies are part of ‘active listening’, which forms part of authentic spoken interaction.

An extension of this is to make some reference to what the partner has said at the beginning of the following turn, ‘linking your contributions to those of your partner’. This comes in the marking criteria for FCE and above, but it is useful to train even PET level students to do this in a simple way. Perhaps the easiest way is a simple expression of agreement / disagreement – ‘Yes, I agree with you, but don’t you think…’, or ‘I see your point,, but…’.

Now watch this video of Part 3 of an FCE exam and observe how the candidates work together:

Finally, when interacting either with the examiner or the other candidate, don’t be afraid to ask for clarification if you are unsure what they have said. It is fine to ask ‘Can you repeat that, please’ if you are not sure about an instruction. The examiners are looking for contributions which are relevant, so it is important to know exactly what you are being asked to do. IN parts 2 and 3, the key questions are printed at the top of the pages given to the candidates:

Please note that in the exam, the pictures are in colour (images from Cambridge University Press).

For ideas for speaking activities, click here.

Related articles:

Tips for Speaking Tests (I)

Tips for Speaking Tests (II)

Getting them speaking

Picture dictations

Tips for Speaking Tests (II)

In the first post in this series, we looked at structuring contributions in the speaking test, giving full, developed answers. In the second post, we are going to look at the language we use in the speaking exam.

In all levels of Cambridge exam, from YLE Starters up to Proficiency, there is, logically, a specific mark for pronunciation. When we talk about this aspect of language, there is a tendency to focus on accent, and specifically whether the candidate is capable of reproducing a particular native speaker accent. However, the examiner is not measuring the non-native candidate against a native-speaker norm. The emphasis is instead on reproducing the individual sounds, intonation and stress patterns of English in a way which does not impede comprehension. While higher levels of exam require the candidate to be ‘intelligible’, lower levels, such as KET or PET allow for a fairly intrusive L1 accent which may make comprehension more difficult at times.

The above video, from the Cambridge English TV channel on You Tube, focuses on word stress, and how a change in stress may mark a change in meaning, and so impede understanding if not reproduced accurately. This word stress can be realised in any accent, native or non-native. Similarly, sentence stress is not dependent on accent. English is traditionally a stress-timed language, as opposed to a syllable-timed language like, for example, Spanish. This means that a successful candidate should be able to place the stress on the correct syllables within an utterance, and at higher levels (CAE or CPE particularly) the candidate should be able to use stress to suplement the meaning of the utterance.

Another important aspect which can be reproduced accurately whatever the accent of the candidate is intonation. A successful candidate should be able to use rising and falling tones within the utterance in order to indicate the internal structure of the utterance, usually rising at the end of each element of a list, for example, or at breaks in an utterance usually represented graphically by a comma, then falling at the end of an utterance, represented graphically by a full stop.This can actually have more effect on understanding at times than accuracy in individual sounds. Several years ago, I examined a PET candidate who reproduced individual sounds acurately, but whose intonation was so wrong that he was almost impossible to understand.

Clearly examiners must also focus on the accurate reproduction of individual sounds. However, different accents imply different versions of individual sounds. Here too, the important thing is to be understood with relative ease, avoiding as far as possible L1 intrusions. It doesn’t matter if the student pronounces ‘Tomato’ as in British English or in American English, but if they say ‘city’ as ‘thity’ (a typical Spanish error, since in Spain, the ‘ci’ and ‘ce’ are pronounced ‘thi’ and ‘the’), that impedes understanding, and so is marked down.

Tips for Speaking Tests (I)

As the main external exam season starts, I thought this would be a good time to write a series of posts giving tips for how to approach the speaking exams in particular. To kick off, here is a new video from Cambridge English TV with some useful ideas about answering questions in the speaking tests.

Clearly, you cannot be marked on language which you do not produce, so you should aim to answer questions fully. However, sometimes the question seems to be asking for a simple answer – an apparently closed question with no interrogative pronoun. In this case, the temptation is to give the simple answer, but these questions are provided with a possible back-up question in the examiner’s script – ‘Why?’, so if the candidate does not elaborate sufficiently in their answer, they can be prompted to do so. It causes a better impression if the candidate does not wait to be asked why, but explains and elaborates their answer from the beginning. It shows they are more willing to speak, and gives a more natural feel to the conversation.

English: Speech balloons. Question and Answer....

(Photo credit: Wikipedia)

There is a great temptation to prepare answers beforehand, particularly for the questions in Part 1 of the test which everyone is asked (‘Where are you from?’  ‘Where do yo live?’ or ‘What do yo like about living there?’, for example). However, it is usually quite obvious to the examiner that an answer is prepared, and it will possibly be cut short. Teachers should be particularly wary of relying on prepared answers for their students. In one examining session last year, I examined eight or ten candidates from the same class, one after another. When asked ‘What do you like about living here in Madrid?’ every one of them spoke of the fantastic public transport system which the city has. Clearly, this quickly became irritating and received no credit.

Picture dictations

Day five of the Five days five posts series, and unfortunately this is just post four. I’m writing this on the train bound for Córdoba, where I am giving a workshop on speaking activities for teenagers at the XIV Jornadas CETA (Córdoba English Teachers Association).

For this post I’m moving away from working with video, and focusing on one of the activities I’m going to use in my workshop this afternoon. In the PET speaking exam, students are given a photograph and asked to describe it. Many candidates simply give a list of things that come in the photograph, but stronger candidates distinguish themselves by organizing their descriptions in a more orderly way. This activity is a simple way of helping them to achieve a more organized way of describing a scene.

I begin this activity by revising prepositions of place and ways of describing position in a picture – at the top, at the bottom, in the top right corner, etc. then we describe a photograph together as a class, to make sure they are using the vocabulary correctly.

Then the students are seated in pairs, back to back. One of them is given a photograph and is asked to describe it to their partner. The partner has to draw the picture as it is being described. The student describing the picture has their back to the other student so that s/he cannot make adjustment to the picture which is being drawn. The other student only has their partner’s words to guide them as they draw. If they are unclear about a detail, they can ask for clarification, and in that way they help their partner to structure a description in a more logical way. Once the description is finished, they compare their pictures with the original photograph. Then they change places and the exercise is repeated.

The pictures can be of anything, so it is a good idea to tie them in with the topic which you are covering in class at the time (a good source of free pictures is www.eltpics.com). If possible, I like to project the photograph on the IWB, which means that everyone is describing the same picture at the same time, as this allows them to compare their drawings not only with the original but also with those of their classmates, and this can be quite motivating. If this is not possible, photographs cut from colour magazines work just as well, and the students can be asked to bring the photos in themselves, which saves on preparation time. A good tip is to keep any photos they bring in in an envelope in class, so that fast finishers can repeat the exercise in future classes.

Heads Up English | ESL Lessons – Early Graduation

http://www.headsupenglish.com/index.php/lower-intermediate-students/lower-intermediate-news-lessons/lower-intermediate-education-lessons/461-early-graudation

100th Post

This is my 100th post on this blog, and I feel this is a good occasion to thank all the people who have visited this site and shown interest in what I have published here. I hope you have found it useful.

thank you for your attention