CAE Formal Letter of Complaint

It’s always great to find material out there for CAE, and even more so if it’s material for writing.

Tim's Free English Lesson Plans

complaint box

Just a quick note…

Before you use these materials… We’ve created a new podcast aimed at B2+ level English students and teachers alike. You can listen for free at our SoundCloud page below. We have released 5 episodes so far and you can download teacher’s notes to accompany them from our Facebook page or from this blog. All comments and feedback welcome! Give us a like and a share 😉

https://soundcloud.com/2tspod


https://www.facebook.com/2tspodcast/

This is a lesson plan designed to prepare students to tackle formal letter of complaint tasks that can come up in both parts of the CAE writing paper.

Here is the link to the first handout which contains an example of a formal letter of complaint on page 2. Page 3 has the task the students will complete, which is referred to in the prezi.

Here is the link to the prezi, and here is the handout that…

View original post 13 more words

‘It was a dark and stormy night…’ – Resources for Halloween

English: American Jack O Lantern, a Hallowe'en...

(Photo credit: Wikipedia)

It’s interesting how a pre-Christian festival from the north of Europe seems to have taken hold worldwide. However, there’s no denying the popularity of Hallowe’en, so here are a few resources which we can use in class this week, promoting skills and vocabulary development while following the Hallowe’en theme. I’ve tried to grade them by age, but different teaching circumstances mean that different activities will be useful for different students. If you’re unsure of any details about the history of Hallowe’en, this infographic will provide you with plenty of information about how the festival has evolved over the centuries.

Pre-Primary / Early Primary

The objective of this festival for very young learners is to avoid scaring them while giving them the opportunity to learn a new song or to make something in arts and crafts which will link them to the idea of Hallowe’en. One of the things we do with our youngest students is pumpkin carving. The teacher wields the knife, but the students get a chance to help empty the seeds and design the scary face to cut out. The Jack o’ Lantern created is then used to decorate the class on the 31st October. In parallel with this, the children can prepare Jack o’ Lantern masks to wear on the day. You can find other ideas for Hallowe’en masks here.

Trick or treatAnother fun activity for younger learners is to go Trick or treating around the school. This takes a bit of organising, but the kids love it. Have each class group prepare a Hallowe’en song before the day of the festival, then organise a rota so that each class can visit another class of the same age. The visiting class sings their song to the others, and then each student receives a gift (traditionally sweets, but check your school’s policy on this type of treat beforehand). This is particularly good fun if the students can come to school dressed up for the day! If they can’t come in dressed up, it would be nice for them to have masks prepared in class. If the teacher has prepared a Jack o’ Lantern for the class, they can carry that with them when they visit the other classes.

Primary

halloween-dracula-mix-match-printables-photo-420x420-fs-img_0110

Photo credit: http://spoonful.com/

For older primary students, articulated Hallowe’en decorations can be great fun. You can find a number of diferent copiable designs here. This can be combined with the CLIL science class if you choose to make articulated skeletons. These can be combined with Jack o’ Lanterns, and spiders webs made from teased cotton wool to create a really spooky atmosphere for the classroom.

On the British Council Learning English website, there are several games for Hallowe’en. For example, here is a version of ‘I Spy‘ for Hallowe’en, useful for practising vocabulary. There is also a spelling game, ‘Spelloween‘ which promises to be a lot of fun.

Another idea would be to try out traditional children’s party games, such as Apple bobbing, where you try to get an apple out of a bowl of water using your mouth. If this is considered too risky, you can make the activity safer but even messier by placing the apples in a tray of flour! Other traditional games can be adapted to a Hallowe’en theme – for example, ‘Pin the tail on the donkey’ can easily become ‘Pin the tail on the witch’s cat’.

Secondary

In secondary, we seem to pay less attention to festivals in general, but there are still some useful activities which we can do with our students. One possibility, if they have an intermediate level or above, is to challenge your students to write a ghost story. You can give them the first line, perhaps ‘It was a dark and stormy night…’ and have them complete the story, either individually or in pairs. it would be a good idea to brainstorm typical vocabulary from ghost stories first, and possibly talk about the usual structure of this type of story. Alternatively, you could take the first paragraph of a ghost story and turn it into a jigsaw dictation (there are many ghost stories available as graded readers, so this should not be too hard to organise). Once they have reconstructed the opening paragraph, you can have the students write how they think the story continues. Mission Impossible! also lends itself very well to creating Hallowe’en stories, and the Zombie round is particularly apt!

An alternative to writing exercises can be found on You Tube, courtesy of Mr Skype lessons. This is a listening exercise based on a short story by Sir Arthur Conan Doyle:

The art work which accompanies the listening text is fantastic.

Finally, here’s a full lesson plan from the British Council’s Learning English website, based on the story ‘The King of Pumpkins‘. I hope you enjoy these resources, and feel free to add more which you have used and enjoyed.

Happy Hallowe’en!

Improving writing

I came across this in Larry Ferlazzo’s article for Education Week Teacher, and thought I would share it here. It underlines the importance of pre-writing activities in the classroom, rather than just expecting students to launch into writing a text.

Whenever we set up a writing activity for our class, the temptation is to set the writing for homework and expect our students to produce a reasonable text to be handed in at the start of the next class. However, the reality is very different. What we should really be doing is modlling best practices in writing, and this can only be done if the writing is done at least partly in the classroom. Students should be taught a series of steps to follow when approaching a writing assignment, which includes generating ideas, selecting and organising these ideas, and drafting, and an important part of the acquisition of these practices comes in classroom talk around the writing assignment. Particularly at the beginning, students need the support of their peers and of the teacher in order to generate reasonable ideas and cogent arguments, and a simple way of testing these arguments is to try them out on peers in the classroom. Student talk in the classroom therefore allows them to share ideas and to test how powerful these ideas are. In addition, the teacher is at hand at the beginning of the actual writing phase to ensure that no student suffers from ‘writer’s block’ when faced with a blank page. A writing assignment can be finished at home, but if we want the best from our students, we should be prepared to dedicate some class time to it as well, particularly in the early stages.

Improving writing

Writing in Primary – Part III: Extended writing

child writing

In the first part of this series, I looked at how to initiate early primary students in writing in English, and in Part II I focused on how writing activities can be built into the CLIL classroom. In this, the third part of the series, I’m going to look at ways to get students producing longer texts, either on their own or as part of a team. Here, the focus is inevitably on upper primary, although the ages at which the different activities can be used will vary widely depending on the programme of each school, and some of these activities may be more suited to early secondary in some schools.

Scaffolding longer texts

One of the things which less proficient writers find daunting about producing longer texts is the very fact that they are being asked to write something longer than a couple of sentences. Faced with the blank page, they will often simply tell you they don’t know what to write. As teachers, our job is to support them in this stage, helping them to develop strategies which will allow them to develop longer texts. For this reason, it is very important that longer writing tasks be done in class rather than for homework – the students will need individual support as they begin their writing. Once they are writing confidently they can be asked to finish their work for homework if need be. I find the best way to scaffold longer texts is to break down the requirements into smaller, more manageable parts. In Part II we saw an example of this with the water cycle exercise, Imagen water cyclewhere the students were asked to write one or two sentences about each step in the process, rather than simply being asked to write a paragraph describing the water cycle. On the worksheet the different steps are visually separated, so that what they are producing does not have the appearance of a long text. Once the students have produced their texts on the worksheet, you can ask them to copy the corrected version into their notebooks in the form of a paragraph, so that they realise how much they have been able to write, but only after they have successfully completed the worksheet. This enhances the sense of achievement, and success breeds success.

Picture stories are another useful way of breaking down longer more complex texts into more manageable parts. I use the stories from the speaking part of the Movers and Flyers exams, and in this way the students have more practise with the type of story they will face in the exam at the end of the year. You can see an example of one of these stories here, taken from Gray (2000).

Flyers Speaking Story

We can also get our students to make comic strips, producing their own pictures and adding text to each one. This can be done very simply by folding a piece of paper in half, in half again and in half again, which will divide the page into eight sections, for eight pictures. A more sophisticated alternative is to make a mini-book, instructions for which you can find here. This is a great way to check comprehension of something done in class, whether a story, or the steps in a process. I have used it to review extended reading, and to wind up work on biographies of famous people.

Collaborative writing

Another way to scaffold longer texts is to have students work together to create a text. This can be modelled using the ‘Mission Impossible!‘ activity, where each student has to create a correct sentence to form part of a story against the clock, with the teacher writing the story up on the board. Then put the students into groups of four and explain that each person will dictate one sentence of the text to the rest of the group. The other members of the group decide if they think the sentence is correct and appropriate or if it needs editing, and when they are all satisfied with the sentence they all write it down. Then the next person in the group dictates what they feel should be the next sentence in the text, and so on. This can be used to write picture stories, or any kind of text. It is very important that they have a clear idea of what they have to write about before they begin. I have used this to practise writing descriptions of places, projecting a photograph so that they are all describing the same place. This is also useful as practice for the Cambridge Preliminary (PET) speaking exam, where candidates are asked to speak for a minute about a photograph.

A slightly crazy version of collaborative writing can be a lot of fun for the end of term (although don’t expect great quality from the texts produced). Each student starts off with a piece of paper, and the teacher dictates the first sentence of a story, appropriate for the time of year or the topics being covered in class at that time. Each student then writes the next sentence in that story, and passes the paper to the student sitting next to him / her. each student then has to write the next sentence of the story they have in front of them before passing the paper on again. In this way you have as many stories circulating in the classroom as there are students, and each one will be different. As I have said, this is just a fun activity, but the students are still reading each text and writing, as well as revising what has been written before.

Final words

As I said at the beginning of this post, these activities may be suitable for primary students in some schools but more suitable for secondary students in other settings. The important thing is to get our students writing as early as possible, so that producing texts is seen as a normal part of the English (or CLIL) class. There are many other techniques we can use, and I hope that readers will share their own ideas through the comments section. One thing I have not touched on here is the use of technology in the writing class, and I hope to come back to that topic soon.

References

GRAY, E. (2000) Skills Builder for Young Learners: Flyers 1 – Student’s Book Newbury, Express Publishing.

Writing in Primary – Part II: CLIL

In the first post in this series, we looked at ways in which we can introduce young children to writing as part of their EFL class. In this post we examine the opportunities which CLIL gives us to extend and develop our students’ writing skills as they move up through the school, and how writing in the CLIL classroom can be linked to the external Cambridge exams.

Writing

(Photo credit: Wikipedia)

In the early science classes, students talk a lot about the classification of animals, and we make wall displays of the different classes of animals – fish, birds, amphibians, mammals and reptiles – with representatives of each class and the key 20120210_123850 (1)vocabulary for defining each class. The students’ attention is drawn to these labels in each lesson as we review and discuss different animals, so that they quickly become familiar with the vocabulary. Sometimes, before they come into the classroom, we move the words around, then get the students to help put them in the right places again, thus ensuring that the students are famiiar with reading the vocabulary. Once they are comfortable with the language, they can create a small project, writing about their favourite animal, using the key vocabulary from the unit and simple grammar structures such as ‘it’s’ and ‘it has got’, illustrating their texts with drawings or pictures cut out from magazines (or these days, downloaded from internet).

An extension of this exercise, and a much-loved activity each year, is the ‘Monster gymkhana’. Here, the students are working with the parts of the body, 20120210_123804 (1)numbers, sizes and colours, using the same verb structures as before. This activtiy begins as a reading exercise, seen here, a mute dictation in which the student has to draw the monster described in the photocopy and colour it appropriately. Once this has been done, the students are put into teams and given the task of designing their own monster. Then we take them out to the playground, where cut-outs of different body parts are distributed, legs in one place, arms in another, heads in a third, etc. Each set of cut-outs is labelled with the name of that body part. Each team of children is given a large card and some glue, and they race to find the different body parts they need to complete their monster design. We like to leave the finished monster designs on display in the playground so that the children can show their peers from other classes and their parents at playtime or after school. Once they have done the gymkhana itself, back in the classroom, each student writes the description of the monster they have constructed, and these descriptions can be added to the display.

These classification exercises use very simple grammar structures but at the same time they allow the students to express differences between items, which is used a great deal in the YLE speaking exams. In both Movers and Flyers, students are asked to spot the difference between two similar pictures, and in Movers they are also required to say which picture is the odd one out in a group of four, giving a reason.

Imagen jumbled bones

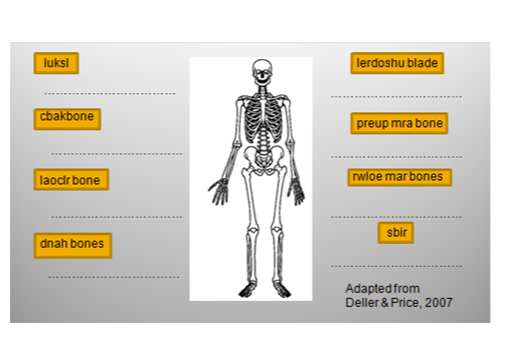
(Adapted from Dellar and Price, 2007)

Another skill students need for the YLE exams is the ability to unjumble letters to form words, and this skill can also easily be practised in the CLIL class, as well as in the literacy class. For example, give students a worksheet where the different parts of the body are labelled on a skeleton,  but each part is jumbled, and the student has to write the items of vocabulary correctly. Here the student is focusing mainly on spelling of key vocabulary items, which may be more complex than the words which they usually employ in their writing.

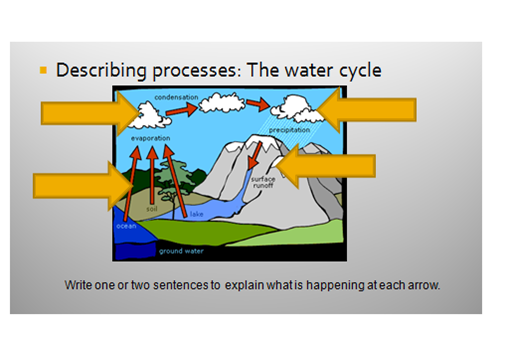
As students progress they can be expected to write more, and here it becomes important that they learn to structure their texts. One way in which they can do this in the CLIL classroom is by describing processes, where there is a clear sequence to follow. Here is a worksheet on the water cycle, which they students are asked to label:

Imagen water cycle

However, instead of requiring the students to produce the key vocabulary, they are provided with the technical words on the diagram and asked to write one or two sentences to explain what is happening at each point in the process. Initially, the students are asked to write on each arrow, but as they gain confidence in this sort of exercise, they can be asked to write all their sentences together as a text, linking with sequencing words – ‘first’, ‘then’, ‘finally’. This scaffolding of longer texts will be the subject of the third post in this series.

Bibliography.

Deller, S. & C. Price (2007) Teaching Other Subjects Through English Oxford, Oxford University Press.

Writing in Primary – Part I: Early Years

Imagen1

The growing importance of writing

In any primary classroom, the spoken word is paramount. Young children have the capacity to acquire a foreign language in a natural way, almost without realising it, if they are exposed to the language early enough and extensively enough, and this is exploited. Our main objective in the primary classroom is to enable our students to communicate effectively in the foreign language. Literacy in L2 is something that takes second place in many schools, indeed it is sometimes even supposed that literacy in the mother tongue will be enough to enable students to read effectively in English. Writing, at least writing more than the odd sentence, is hardly touched upon until the students are much older, and again there is a supposition that what they have learnt in their mother tongue means that they should be capable of writing in English.

However, things are changing. Over the last ten years, what is required of students in Primary has increased dramatically, with various bilingual programmes being developed and with CLIL becoming more prevalent in the teaching of a foreign language. Added to this, the Cambridge YLE exams have become increasingly popular, and in some countries it is increasingly normal for KET and even PET to be done while the students are still in Primary, helped by the development of the ‘for Schools’ version of these exams. If these objectives are to be achieved, it is important that attention should be paid to writing and text construction from a much earlier age, in parallel with the development in oracy which has been foregrounded for so long. In this series of posts, I will examine how we  can implement a structured approach to writing from a very early age in order to cover the requirements of CLIL and the different external exams which our students now face. Much of what I will say comes from my own experience working in schools with students between five and twelve years old.

Part I: Getting started – Writing in the early years

Perhaps I should make it clear form the outset that I take quite a wide perspective on what constitutes ‘writing’ with very young children, as I explained in this video interview I gave a few months ago.

My main focus at this age is to get the students engaging with the language, creating their own texts, and sometimes the mechanics of writing get in the way of this creation, so we have to cheat a bit at first.

child writing

I begin to engage my students with writing really before they can read English properly. My first step is through their pictures. Quite often I get them to draw in class, perhaps what they did at the weekend, or a visit we made to the zoo, or the theatre.  Once they finish their picture, I get them to tell me a little about it (not quite ‘That’s lovely dear – what is it?’, but fairly close sometimes), and in that way I can engage their oral skills and help with vocabulary. Once we have talked about the picture, I get them to suggest a title for it – this usually comes out initially in Spanish, but again I help them with the language until they can say it in English – and then I write it on the picture for them. Although they are using me as a scribe, the words are ultimately theirs, so from a broad perspective, they are creating their own written texts. As they are learning to write in their mother tongue, their curiosity in the written word is acute, and quite often they try to copy the title which I have written for them. Whether they do it well or not at this stage is not important, what is important is that they develop a feeling of ownership of a written text. To this end, it is important to display their work, so that they can show it to their other teachers and to their parents.

Imagen3

Once the students have begun to learn to read in English, the creation of texts can also become more complex. At this stage, the main problem we come across is that the students are still mastering the mechanics of writing and so any writing the students do will be painfully slow. for this reason, I sometimes prefer to give them the words written on individual cards, so that they can create their texts without worrying about the mechanics. One activity I have done is to give the students the words from one of the reading books they have been working on (we use the Oxford Reading Tree series). In groups, the students work to recreate the text of the story they have worked on. Once they have done this, they are encouraged to create different sentences using the same words, trying to make a new story.

In the next post in this series, I will examine how we can incorprate writing into our CLIL classes, particularly science.

Variations on dictations

finger on it

This week I am working on dictations with my different groups, and I thought I would share a couple of ways I have found to make them a bit more interesting, both for the students and for myself.


Dictogloss


With my more advanced groups, I am using a dictogloss, rather than a traditional dictation. The teacher divides the group in half, and sets one half some work to do outside the classroom. This week I had them preparing a presentation on a famous person. Meanwhile, the teacher does the dictogloss with the other half of the group. This exercise consists in reading a text to the students three times at normal reading speed. During the first two readings, the students listen, and after each reading they are given time to write what they remember. During the third reading they are allowed to write, so that they can check and complete their texts. After this they should be given some time in pairs or groups of three to check their work with each other. This usually leads to some interesting discussions on grammar and structure as they access what they know in order to reconstruct the text.


The other half of the group is then brought back into the class, and each one is paired with someone who has done the dictogloss. These then dictate the text they received as a dictogloss to their partners (this is done as a normal dictation rather than as a dictogloss). Finally, the teacher collects the resulting dictation, and then projects the original text so that they can check their own answers.


In this video, you will see Dave Spencer from Macmillan doing a dictogloss exercise with a group of students.


Jigsaw dictation


With my less-advanced students, I am doing a variation of a running dictation. Before the class, I copy a text of a level which the students will find relatively easy, but I place the sentences in a different order. The disorganized text is pinned on the wall. The class is divided into teams of three or four. One member of each team goes to the text and memorises the first part before going back to his / her team and dictating it to them. The second member of the team then goes to the text and memorises the next part and so on. While the second member of the team is at the text, the first member of the team writes down what s/he has just dictated, so that everyone in the team has a complete text.


Once the team has dictated the whole text, they must decide the correct order for the sentences, writing a clean copy of the text. This can be treated as a race, or each team can simply read out their version of the completed text at the end of the class before the teacher projects the original text for them to check their work.


Here is a video with other ideas for organising a running dictation.


For an extension activity for running dictations, particularly for younger students, click here.


Let’s Share: Teaching Writing to Young Learners | Oxford University Press

Here’s a link to another post about teaching writing, this time a webinar about teaching writing for young learners:

child writing

http://elt.oup.com/events/global/lets_share_teaching_writing_to_young_learners?cc=global&selLanguage=en